Amira on iPads: Recommended Setup & Instructions
Amira can work well on iPads, and a quick setup routine (plus a few student habits) makes a big difference - especially for high-stakes assessments. Please review our Technical Requirements article prior to setting up your device.
If you are looking for information on MDM settings, click here.
iPad Readiness Checklist
Before starting, check to make sure that your device is set up correctly for use with Amira.
1. Ensure you are using Safari.
On iPads, Amira works only with Safari (not Chrome or Edge). If your browser displays a message that you need to update your browser, then update your browser by following the prompts on the screen. If the message is still displayed after you update the browser, try clearing your browser cache and cookies.
2. Always Allow the Microphone
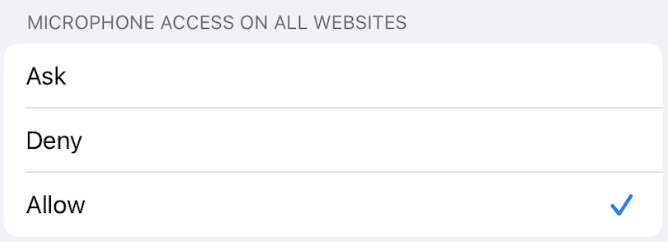
To avoid access issues, we encourage you to enable the Safari browser to Always Allow use of the microphone.
Scroll down to "Settings for Websites" and click Microphone

Choose Allow to allow the use of the microphone without permission every time you visit a website.
3. Install the Latest iOS Version
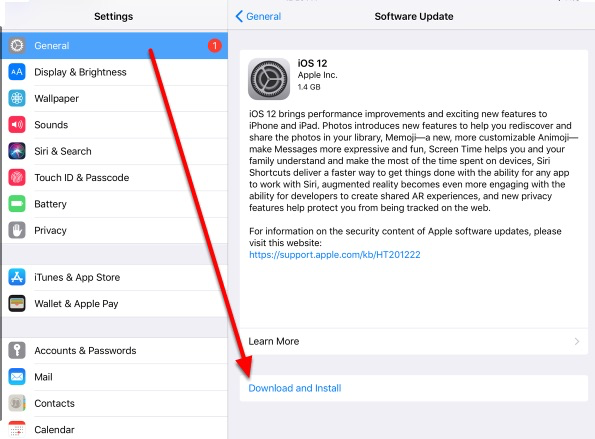
Amira performs best on an iPad with the most current iOS version or up to two prior versions. Older versions of iOS are not guaranteed to work. To install, make sure your device is plugged in and connected to the Internet. Then, follow these steps:
- Go to Settings > General > Software Update
- Tap Download and Install
Explicitly Teach Student Behaviors
Model and practice behaviors that help Amira hear student reading clearly.
FOR STUDENTS USING THE IPAD MICROPHONE (Best for quiet classrooms or daily practice)
Setup Recommendations
- Place the iPad on a stand, not flat on the desk.
- Tilt the iPad about 60 degrees away from the student.
- Position the iPad 6-12 inches away from the student.
- Teach students to keep their hands away from the microphone.
- If available, turn on Mic Mode → Voice Isolation in the Control Center to help reduce background noise (availability varies by iPad model, iPadOS version, and app).
Behaviors to Teach
- "Hands off the mic" Holding the iPad can cause a student's hand to cover the microphone, which may be on the back or side of the device. This can affect how clearly reading is recorded. Teach students to read without holding or touching the iPad.
- "Stay in the Goldilocks Zone" Sitting too far from the iPad microphone can make a student's voice too quiet. Teach students to use a "just right" reading voice---not too loud and not too soft---and stay about 6-12 inches away from the iPad (not too close, not too far).
FOR STUDENTS USING A HEADSET WITH MICROPHONE (Best for assessments and noisy classrooms)
Setup Recommendations
- Use a headset for assessments whenever possible. iPad microphones may be too far away and result in quiet audio.
- Use USB-C headsets on USB-C iPads for more reliable audio.
- Check the Control Center to confirm the headset is selected for audio input and output.
- Keep Mic Mode set to Standard unless there is significant background noise.
- Keep Monitor or Listen features turned OFF when available to avoid distracting audio delay.
- Position the microphone correctly: About one finger-width from the corner of the mouth, not directly in front.
Behaviors to Teach
- "Hands off the mic" Touching, covering, or turning the headset mic on or off can affect how clearly reading is recorded. Teach students to read without touching the microphone.
- "Mic in Corner of Mouth" Placing the mic directly in front of the mouth or on the lips can cause distorted audio. Coach students to keep the mic one finger-width from the corner of the mouth, not directly in front.
- "Stay in the Goldilocks Zone" Sitting too far from the iPad microphone can make a student's voice too quiet. Teach students to use a "just right" reading voice---not too loud and not too soft---and stay about 6-12 inches away from the iPad (not too close, not too far).