Follow these steps before you start using Amira with students. Please review our Technical Requirements article prior to setting up your device.
1. Ensure your browser is updated.
To use Amira, you need to use an up-to-date web browser. For best results Amira works best using Google Chrome. Amira supports the latest two versions of all major browsers, unless otherwise noted. If your browser displays a message that you need to update your browser, then update your browser by following the prompts on the screen. If the message is still displayed after you update the browser, try clearing your browser cache and cookies.
Click here to find out what browser you’re using. For help on updating your browser, try these links: Chrome, Edge.
2. Always Allow the Microphone
To enable microphone access for Amira, click this link and follow the steps for your specific browser.
3. Ensure any voice recognition software or browser extensions are disabled.
4. Ensure apps have access to your microphone.
- Select Start > Settings > Privacy > Microphone . In Allow access to the microphone on this device, select Change and make sure Microphone access for this device is turned on.
- Then, allow apps access to your microphone. In Microphone settings, go to Allow apps to access your microphone and make sure it's turned On.
- Once you've allowed microphone access to your apps, you can change the settings for each app. In Microphone settings, go to Choose which Microsoft apps can access your microphone, and turn on apps you want to use with it ( you'll choose Chrome or Edge here depending on the browser you use).
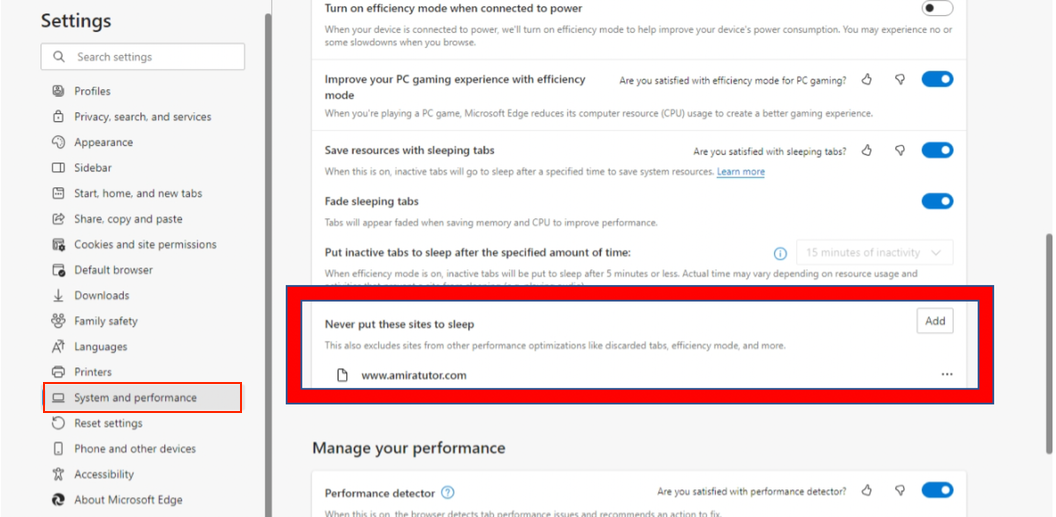
5. For Microsoft Edge users add student.app.amiralearning.com to the never put these sites to sleep list. For Microsoft Edgers users in Canada, add secure.ca.amiralearning.com.
- Navigate to the settings menu
- Select system and performance
- Add student.app.amiralearning.com to Never put these sites to sleep.