Follow these steps to set up Chromebooks for student and teacher access to Amira. Please review our Technical Requirements article prior to setting up your device.
1. Ensure your browser is updated.
To use Amira, you need to use an up-to-date web browser. For best results Amira works best using Google Chrome. Amira supports the latest two versions of all major browsers, unless otherwise noted. If your browser displays a message that you need to update your browser, then update your browser by following the prompts on the screen. If the message is still displayed after you update the browser, try clearing your browser cache and cookies.
2: Always Allow the Microphone
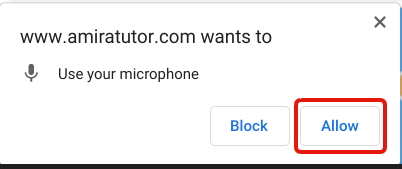
Your browser should ask for permission to access the microphone the first time you use Amira. You should only need to give Amira permission once.
HMH Ed users will launch Amira from HMH Ed, and a new tab will open in student.app.amiralearning.com. Once that happens for the first time, you will see the following message. Click Allow.
To ensure access to your microphone has been given, follow these steps:
|
1. Click the 3-dot menu in the right of the browser. Then click Settings. | 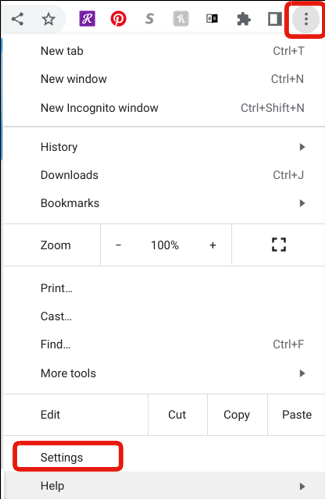 |
|
2. Click Privacy and Security on the left hand side of the screen. Then click Site Settings in the middle of the screen. | 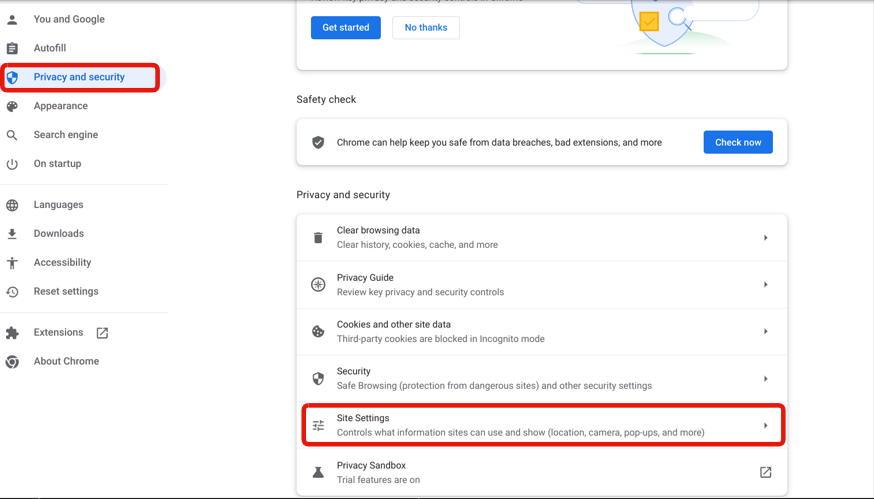 |
|
3. Click Microphone | 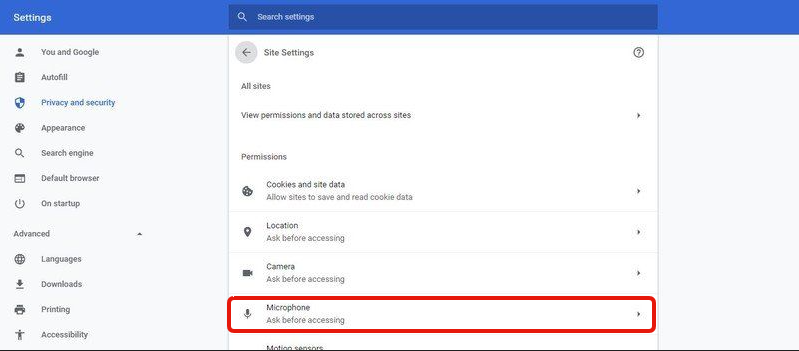 |
| 4. Confirm that student.app.amiralearning.com is listed under Allowed to use your microphone. |  |
3: Close Out Other Chrome Tabs
In order to optimize Amira’s performance, make sure to close out of additional programs or websites running in the background, keeping just your Ed and Amira Tutor tabs open.
4: Adjust the Volume on the Microphone
Let's make sure that your Chromebook is set up to hear students. Click the time in the bottom right hand corner of the screen. Then click the arrow to the right of the volume bar.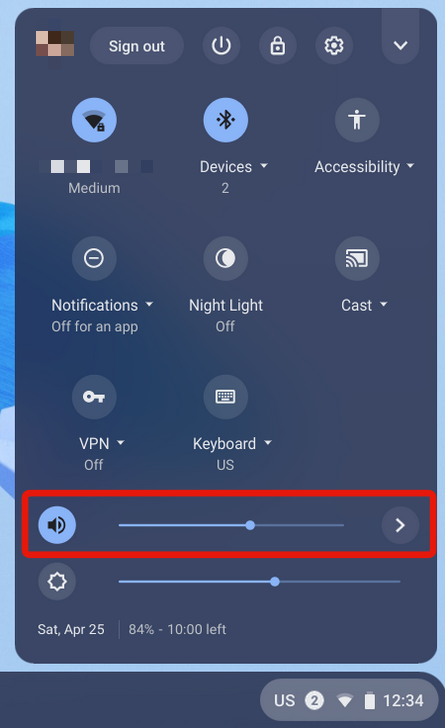
Note: Click the arrow on the right-hand side. The Input Microphone (internal) setting should be at about 50%.
Follow these steps to enable Kiosk mode for Chromebooks.
- Go to the Google Admin Console: admin.google.com
- Select the Organizational Unit (OU) where the student devices are enrolled.
- Navigate to: Devices → Chrome → Apps & Extensions → Kiosks
- Click the yellow "+" icon and select Add kiosk app.
- Choose Add by URL (do not search the Chrome Web Store, Amira isn't listed there).
- Enter the Amira launch URL: https://home.app.amiralearning.com
- After adding, scroll down to Additional URL origins and add each of these (exactly as shown):
https://student.app.amiralearning.com
https://lti-auth.prod.amira.cloud
https://home.app.amiralearning.com
8. Save your changes.
9. From the Admin Console, force a device policy sync or reboot the managed Chromebooks.